Showing posts with label repurposed. Show all posts

Tuesday, February 25, 2014

If only it were as easy as Flea Market Flip. A re-finishing rant.

A friend, and one of our dealers at Carver Junk, sent me this blog post a few weeks ago. It hit home, and I've been trying to think of a way to post it for our fans/followers/customers to see, without making it seem cranky. While noodling on how to do that, I've also been (completely unrelated) DVR'ing episodes of Flea Market Flip, and catching up on them on Sunday nights. We've had a ton of people ask us if we've ever seen the show, because they "LOVE IT!"

Well, here's the scoop on Flea Market Flip. It's completely unrealistic, and gives viewers the impression that big repurposing projects can be completed with quality in less than 24 hours with no additional cost beyond the original purchase price {seriously, who is paying for all that paint, and all the people helping the flippers do the work?!}. And unfortunately, it leads some {not all} of those viewers to expect much lower prices than are feasible at stores like Carver Junk Company.

To illustrate, let's talk about a piece we bought recently, and repainted:

A round pedestal table - priced at $40. The price was fair, so we didn't low-ball or negotiate. We drove 20 miles to pick it up. Because the woman selling it wasn't able to help Chad move it, both he and I had to go, costing us both time - it took about an hour there and back.

I forgot to take a Before photo, so I borrowed this from an online post.
It is pretty darn close to the table we bought.
although the veneer on this one is in better shape; price is also higher}.
Purchase price:  $40
Gas: $7  {yes, our Jeep stinks for gas mileage, but it's great for hauling our trailer}
Time: $40 {we value our time at $20 per hour}

Then, when we got there, we found the reason the table was only $40 {which, of course hadn't been shared when we asked the condition} - the veneer was bubbling on both the top and the leaf for the table. Add an extra 30 minutes of veneer-fixing time.

Fixing: $10

Once it was prepped {fixing the veneer}, we were ready to paint. We use Milk Paint or homemade chalk paint, both of which require no sanding prior. Woohoo! Time savers! But, what we make up for in time, we lose in cost of paint. It's worth it, trust us.

Milk Paint: $18
Wax: $3  {a small portion of a large container used}
Sandpaper, brushes, etc:  $3  {brushes are reused, sandpaper is cheap, but let's add something for supplies}
Bonding agent: $7  {ensures the paint sticks and doesn't require the sanding prep work}

Painting with Milk Paint is actually a time SAVER, because it dries so quickly. We chose a light color, so that meant it required a couple of coats. We'll call it three. Each coat takes about 20 minutes, so we're looking at an hour.

Painting Time:  $20
Distressing/Waxing Time: $3  {about 10 minutes}

It's done! That's it, right? Well, there is also the rent {and utilities} that we have to pay in order to have a place to showcase the table.

Sq Ft Rent for Table:  $25 per month, but we'll assume it sells in one month. It's also possible that it sells in the first day of the sale, and we replace it with something else that sells - this is ideal :)

And there are the folks we have to pay to work at the store while we're open. That only adds a small cost to each item, so we won't even add it here - but it's important to note the number of things that go into "selling" furniture!

So, what does that total look like?
Purchase price:  $40
Gas: $7
Time: $40
Fixing: $10
Milk Paint: $18
Wax: $3
Sandpaper, brushes, etc:  $3
Bonding agent: $7
Painting Time:  $20
Distressing/Waxing Time: $3
Sq Ft Rent for Table:  $25

This table COST us $176 to buy, paint, and put in the store. We'd likely price this table at $249 {which is determined by a lot of factors like our market, the piece itself, current demand for this type of item, etc.}

Can you see all the distressed and chippy goodness in this photo? And the finish feels like butter.


Well, it's apparent that we aren't professional photographers, but here is the finished table, with leaf.
It's she a beauty??

So once we've paid ourselves, the bills, and sold the table, we will have $73 left over to go buy another piece of furniture and start the process all over again.

And just for kicks, let's compare our table {$249} to a couple of major retail store tables & prices:
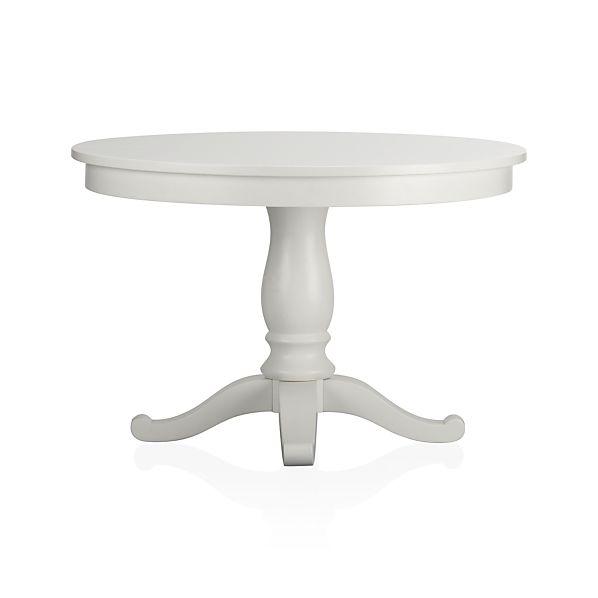

Crate & Barrel,  $499
Pottery Barn, $799

Now, let's be clear. I am not complaining. We LOVE what we do, we LOVE our customers, and we RARELY encounter a situation where someone is disrespectful about pricing. I didn't blog about this in an effort to change anything that happens in our store, nor to make you feel sorry for us - it truly is more about education. In fact, we even offer painting workshops through Carver Junk, so YOU can do these projects yourself if you like! And now, you'll have an idea of what it will cost you in time and real dollars.

{and, you won't be fooled by shows like Flea Market Flip! watch, enjoy, and take it as a great entertainment show :)  }

Monday, August 12, 2013

CJC Wedding and Event Decor Rental

We're excited to share the news that Carver Junk Company will now be offering decor rental for weddings and events! True to our vintage, rustic, repurposed style, our rental items are great options for weddings, baby showers, bridal showers, birthday parties and many other events that have a unique, vintage flair.

Here is a little preview of just a few of our rental items:


Check out the link on the right side of the page (Wedding and Event Rentals) for many more items, quantities, and pricing! And, as always, we are happy to hunt down something special for you that may not be on the list - just ask!

Are there any special items you are looking to rent or purchase for your big day? For some other event? Let us know in the comments below!

Thursday, May 16, 2013

May Sale, 2013

Whoop! Our May sale is just one day away! {and we have so much yet to do, but that's another story...}

Address:  300 Broadway Street, Carver, MN 55315

Here are some fun photos of what you'll find at the store this month. And much, much, more....consider this a little visual teaser. Stop in, say hi, and check out all the fun new {old} junk!


Friday, May 3, 2013

A Fan Challenge: Repurposed DIY Projects. With a Prize!

We've just surpassed 5,000 fans on our Facebook page, and we wanted to do something fun to celebrate!

Remember those Carver Junk Company Mission definitions we posted on Facebook this week? Well, one of them is Repurpose, so....


We're inviting you to share your own Repurposed DIY projects with us, and we're giving away a Carver Junk Company gift certificate to one lucky winner!

Here's the fine print:
  • Email us a photo of a project that you COMPLETED, where you repurposed an item for something other than it's original intended use. For example, we fixed up an old railroad cart to use as a coffee table. It doesn't have to be on such a large scale, though - any project is fair game, as long as it's yours!
  • If you were inspired by Pinterest, go ahead and include a link to the original pin that inspired you. 
  • We will post the photos on our Facebook page {and on this blog}. By submitting photos, you are giving us permission to post them in both locations. {Please only submit photos to which you own the copyright. If you get us kicked off Facebook for violating someone else's copyright, we probably can't be friends anymore.}
  • The photo with the most 'Likes' at the end of the contest will receive a $25 gift certificate to Carver Junk Company!
  • Email address for submissions:  challenge@carverjunkcompany.com

There are no entry restrictions based on where you live. We love ALL of our fans. However, the gift certificate must be used for an in-store purchase. If you're from out of town, it would make a great gift for your favorite person in Minnesota!

And lastly, a huge thank you to all of you who have loved and supported our vision, our store, and our dreams. This has turned from a pie-in-the-sky bucket list item, into a very real, "holy crap we're actually doing this and people seem to love it and we love it and we can't believe how much fun it is" realization. We've worked really hard, and have met some pretty cool people along the way. We couldn't do it without all of you - and so really, as un-cheesily as possible, we THANK YOU!

Chad and Brandy

Saturday, April 27, 2013

Repurposed Mini Globe Pendant Light

We weren't brilliant (oh yes, that was my attempt at a light-related pun...) enough to have come up with the idea of a globe pendant light all by ourselves. I honestly can't remember where I saw it first....Pinterest, most likely. But, we did come across the perfect already-broken mini globe when we were shopping up in the U.P. of Michigan!  The tape had come loose around the center, and it was falling off its base. So, we repurposed it!

We used both halves, making two hanging pendant lights. The pendant light was a kit, and was super easy to put together.

We just cut a hole in the top of each half. Nothing fancy here, I held the bottom of the light socket on the top and traced around it, then cut it with a utility knife. The socket threaded in perfectly, and then for extra security, there is a little round plastic piece that screws onto it from the inside of the globe, sort of sandwiching the globe half within the light socket!  Screwed in an edison bulb from good ol' Home Depot, and hung it up!  It currently plugs into an outlet, but could also be shortened and hard-wired to a switch.

We also use a low-watt bulb in it - still bright enough for light, but the globe is still paper, at the end of the day :)

It's shown here hanging from an antique birdcage stand. {which would also be oh-so-cute for holding a vintage bird cage or wedding decor}!


We think it would be adorable in a nursery or kid's room. Where would you hang it?


Linking Up: Tater Tots and Jello, Be Different, Act Normal,

Saturday, April 20, 2013

A Two-Tone Furniture Craze.

I'm going to hell. The special place reserved for people who willingly take away the natural beauty of a {nearly} pristine piece of antique furniture. I painted a dresser that didn't need paint. Here is what I keep telling myself to justify my sins:  "It was just sitting there, all lonely in the store, with no one to take it home and love it.  You were just helping it find a home."

It's true. And perhaps I feel slightly less guilty because this painted piece looks absolutely incredible. Different from some of the other styles we've done, it's a little chippier, a little more distressed, and a lot more full of character!

We're on a two-tone craze with our furniture these days. Chad picked out the colors/design on this guy - it's similar coloring to the primitive piece we use at home as our TV stand. The lines were so different than our own piece though, that I wasn't sold on the color choices. But, because I love him, and I realize that sometimes my ideas aren't the ONLY good ideas, I went with it. Aaaaaaand, I love it. We love it. It's perfect, and amazing, and beautiful, and I want to keep it. We need a bigger house.

I didn't take any before shots. Trust me, you don't want to see them. Just know this:  There was some slight veneer chipping all around. One of the drawer fronts had a crack through the veneer, and at one point, the entire side of this guy was repaired, and the innards of the bottom drawer replaced. Yes, I'm still justifying....

Without further ado, here he is:


He's painted in our own specially-created version of turquoise {color matched to a clock we bought to match our favorite custom-made curtain panels}, a creamy grayish-white on the drawers, and all finished with clear and dark wax to seal it up and make it buttery soft and smooth.

Do you love the two-tone look as much as we do? What color combos would you like to see on an old empire-style dresser in the future?

Wednesday, April 10, 2013

Handmade in Minnesota. We Love Local!

Each month, we bring in more and more handmade products. While the majority of our store is vintage, antique, or repurposed, we also love to support local artisans. And by "local" we mean Minnesota-based. Many of our in-house dealers make handmade items of their own to sell at the store. Others come from folks who specialize in a particular craft, and we work with them to provide specific products for the store.

Here are just a few of the handmade items carried at Carver Junk Company:


What other handmade items would you like to see at Carver Junk Company?  We're always looking for inventory suggestions!

Thursday, March 14, 2013

Dorothy the Dresser gets a little makeover

I'm not paint-happy. At least not overly paint-happy. I swear. I appreciate a good, pristine piece of wood without any colored stuff on it as much as the next person. In fact, maybe more than a lot of people. Looooove me some walnut wood, in any shade or shape.

Buuuuuut, I also know a lady in need of some makeup when I see one. Let's face it, I have lots of practice looking in the mirror each morning. {I kid, I kid. I rarely wear makeup either.}

This lovely lady came along to us in early January. I named her Dorothy. Anything I spend more than a few hours with, getting to know as intimately as this, deserves a name. Remember Chester?  Anyway, Dorothy was actually in pretty good shape structurally. Except, her left side was a little wrinkly. I mean, that's natural. She's nearly 100 years old, if I have her dates right - I'm thinking 1920s. Her veneer was all chippy, wavy and peely on that right side.


Nonetheless, I was willing to give this lovely lady a shot at a new home just as she was. I asked for some opinions when I posted her on Facebook, and the responses were mixed. Some said paint, some said "don't you dare." Mind you, I didn't post a photo of her wrinkles...so she looked pretty good to those folks. Oh well. I left her be. She sat in the store for 2+ months, with no luck finding a home. So, I decided to give her a little makeover.

Here's how it went down {I am an ultimate picture-taker. Except when I need to be. Then I forget.}:

1. Homemade chalk paint, made from a can of oops paint I picked up at Home Depot for $2.00. I call it creamy gray.

2. Peeled, sanded, patched, sanded her rough spots on the side.

3. Painted two coats of homemade chalk paint in creamy gray. I think it needs a more glamourous name. Perhaps Dorothy Gray from now on? She looks delicious! In a non-edible kind of way. But also a little like a mime, if we're sticking with the makeup theme. {ie, super white and ....white.}

4. An orbital sander with 220 grit sandpaper across her detailed bits, and the edges of the drawers. Whoop, she's coming alive! It's like we just added a little blush and mascara!

5. Now for the bronzer and eyeliner. {Am I taking the analogy a bit too far?} I coated her distressed self with a clear wax all over. I let it dry about 10 minutes, and then used a soft dark wax - a little more around the edges and details, a little less in the open parts. I left the dark wax on for literally about 30 seconds, and then wiped it with a clean rag. I buffed it until I liked the way it blended into the details and feathered out to the creamier gray in other areas, then coated it with another round of clear wax. This removed even a bit more of the dark wax, and evened it all out.

6. Let 'er dry about 20 minutes, and buffed her to a beautiful, waxy shine!

And now, her big reveal. Meet Dorothy!


I just love how the gold/brass hardware plays so nicely with the dark waxed detail and the wood showing through where she's distressed!

What do you think? Have you done any furniture makeovers lately? What's your favorite way to distress and/or wax a piece of furniture?


Linking to: http://www.cozylittlehouse.com/2013/04/tweak-it-tuesday-37/

Friday, January 18, 2013

Instagrams from January Sale!

A quick update - if you're looking for info on this month's sale:  We are open Thursday - Saturday January 17, 18, 19 from 10:00 AM to 4:00 PM.  We are located at 300 Broadway Street, Lower Level   Carver, MN  55315. And, as always, we'll be open by appointment between sales!  We hope to see you!

Here are some Instagram photos from our January sale: