Showing posts with label room and board. Show all posts

Wednesday, May 8, 2013

A Mid-Century Mess made Modern! Chairs get a Re-do.


I found four of these mid-century chairs when we were out shopping a few weeks ago. SCORE!  Ok, my first thought was, "no WAY these are going anywhere near the house." The fabric was absolutely disgusting. As in, I should have worn rubber gloves to take them apart.

We hauled them home on the trailer, and put them in the garage. Then immediately scrubbed our hands.


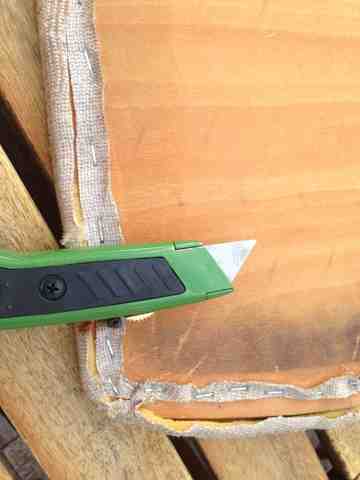
 I disassembled them and, yes, cut right through that nasty old fabric.


The backrest of the chairs was a different style than I've upholstered before, but luckily wasn't too tricky once I looked at the way it was done previously.


Basically, you just staple right into the bottom side of the backrest, wrap the fabric around, fold it over so you get a nice finished edge, and staple right back along the bottom. Then, staple the sides, leaving room for the hardware holes to secure it back to the chair frame.


Here is the chair with just the seat cushion completed. I'm loving this fun fabric. It lends even more "modern" to the Mid-Century Modern style of the chairs. And after what they've been through in their lifetimes, they deserve a little love and excitement.


Excuse the crummy iPhone photos - I'll stage a better shot in the house, and upload when I have time. One down, three to go - I can just picture these around a white pedestal-base table, or tulip-style table. Or, for something even more dramatic, a round black table. 


Where would you put them?  Have you done any chair makeovers? What's the hardest thing you've reupholstered?


Linking up to: Savvy Southern Style, Lady Behind the Curtain, Polka Dots on Parade,

Friday, April 26, 2013

A Great Primitive Find - an Antique File Cabinet. Scrapbook, Photo, Jewelry Storage Cabinet.

We recently found this antique filing cabinet. We're not even sure that's the proper term for it - the drawers are about 1" high, and 15" wide. It would be perfect to use for scrapbooking supplies, photography, or jewelry.

It's also stacking. The whole thing is really three separate units. It could all be separated if you wanted, but there's currently a back on it that connects all three units, and makes it incredibly sturdy.

Take a peek:

Thursday, March 14, 2013

Dorothy the Dresser gets a little makeover

I'm not paint-happy. At least not overly paint-happy. I swear. I appreciate a good, pristine piece of wood without any colored stuff on it as much as the next person. In fact, maybe more than a lot of people. Looooove me some walnut wood, in any shade or shape.

Buuuuuut, I also know a lady in need of some makeup when I see one. Let's face it, I have lots of practice looking in the mirror each morning. {I kid, I kid. I rarely wear makeup either.}

This lovely lady came along to us in early January. I named her Dorothy. Anything I spend more than a few hours with, getting to know as intimately as this, deserves a name. Remember Chester?  Anyway, Dorothy was actually in pretty good shape structurally. Except, her left side was a little wrinkly. I mean, that's natural. She's nearly 100 years old, if I have her dates right - I'm thinking 1920s. Her veneer was all chippy, wavy and peely on that right side.


Nonetheless, I was willing to give this lovely lady a shot at a new home just as she was. I asked for some opinions when I posted her on Facebook, and the responses were mixed. Some said paint, some said "don't you dare." Mind you, I didn't post a photo of her wrinkles...so she looked pretty good to those folks. Oh well. I left her be. She sat in the store for 2+ months, with no luck finding a home. So, I decided to give her a little makeover.

Here's how it went down {I am an ultimate picture-taker. Except when I need to be. Then I forget.}:

1. Homemade chalk paint, made from a can of oops paint I picked up at Home Depot for $2.00. I call it creamy gray.

2. Peeled, sanded, patched, sanded her rough spots on the side.

3. Painted two coats of homemade chalk paint in creamy gray. I think it needs a more glamourous name. Perhaps Dorothy Gray from now on? She looks delicious! In a non-edible kind of way. But also a little like a mime, if we're sticking with the makeup theme. {ie, super white and ....white.}

4. An orbital sander with 220 grit sandpaper across her detailed bits, and the edges of the drawers. Whoop, she's coming alive! It's like we just added a little blush and mascara!

5. Now for the bronzer and eyeliner. {Am I taking the analogy a bit too far?} I coated her distressed self with a clear wax all over. I let it dry about 10 minutes, and then used a soft dark wax - a little more around the edges and details, a little less in the open parts. I left the dark wax on for literally about 30 seconds, and then wiped it with a clean rag. I buffed it until I liked the way it blended into the details and feathered out to the creamier gray in other areas, then coated it with another round of clear wax. This removed even a bit more of the dark wax, and evened it all out.

6. Let 'er dry about 20 minutes, and buffed her to a beautiful, waxy shine!

And now, her big reveal. Meet Dorothy!


I just love how the gold/brass hardware plays so nicely with the dark waxed detail and the wood showing through where she's distressed!

What do you think? Have you done any furniture makeovers lately? What's your favorite way to distress and/or wax a piece of furniture?


Linking to: http://www.cozylittlehouse.com/2013/04/tweak-it-tuesday-37/

Monday, February 18, 2013

Retail Store Inspiration: non-junk-style

It's no secret, I like to shop. You're not surprised, are you?

About a month ago, I had a little "me" time, wandering through the Galleria in Edina, MN. It's a high-end shopping center, at which I typically buy nothing. Except, Crate and Barrel was having a clearance sale, and I'm all about the bargains! It was one of those days with nothing on the agenda, and no rush. I love to shop alone on days like these, because I never feel rushed, or as if I'm making someone stand around while I look at some thing they'd never consider remotely interesting.

Annnnyway. I wandered Restoration Hardware, Pottery Barn, Crate and Barrel, etc, etc checking out what they had. I mean, realistically, they are our competition. Have you seen our amazing antique rail carts? Their reproductions can't even come CLOSE to the real thing - not to mention the prices....whooooeeeee.

But, I did snap a few pics of what I thought were some hot items. I'd love to find some originals of these bad boys to have in the shop. Check out the eye candy below!

Loving the fabric prints, the hardware, and some of the really out-there styles, like the airplane-inspired armchair!


If you want some cool old wheels for decor, we've got 'em. And they won't set you back $99!  


 Above right:  Hey, we've got some skulls and horns, too!


Above: The front and back of the same chair. I saw a lot of the rough, unfinished burlap look. Very cool!


 Above right: I would give my left arm to find an original whatever-those-things-are to make into tables!


Above:  A steamer-trunk inspired desk! How cool is that?


Above left: $145 for this pulley!! None of our pulleys are priced over $45 :)


Friday, January 18, 2013

Instagrams from January Sale!

A quick update - if you're looking for info on this month's sale:  We are open Thursday - Saturday January 17, 18, 19 from 10:00 AM to 4:00 PM.  We are located at 300 Broadway Street, Lower Level   Carver, MN  55315. And, as always, we'll be open by appointment between sales!  We hope to see you!

Here are some Instagram photos from our January sale: